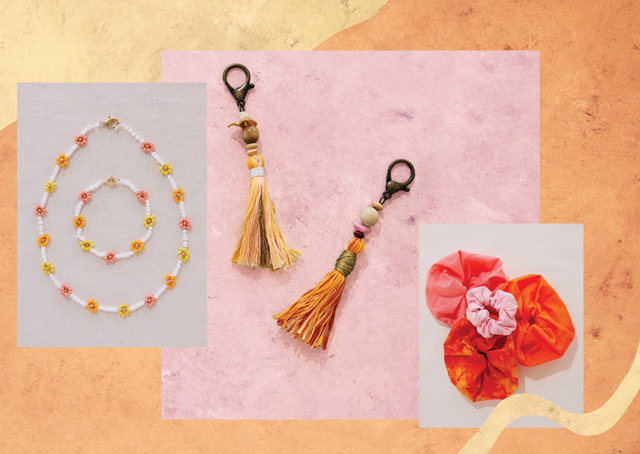
Want some ideas for inexpensive gifts you can make with love and easily send to all your friends? We’ve got you covered with a sassy tassel keychain, a big-ass scrunchie, and a daisy chain necklace—small, simple, lightweight DIYs that won’t cost you a mint to mail. You know what they say about good things and small packages.

The No-Hassle Tassel
Turn embroidery floss into a cute little trinket that will liven up any ol’ set of keys. Just add beads and a lobster claw clasp.
MATERIALS
- Lobster claw keychain clasp with attached jump ring
- Neutral-colored hemp cord
- Embroidery floss in 3 colors
- Metallic embroidery thread
- Decorative beads of your choice (with holes big enough to fit the hemp cord)
- Scissors
INSTRUCTIONS
1. Cut a 20″ length of hemp cord and fold in half. Place the looped part of the cord through the jump ring on your keychain clasp. Take the two ends of your hemp cord and pull them through the loop, tightening to form a lark’s head knot [A]. Add 4 beads by pulling the two hemp-cord ends through the beads in the order you want them to sit.
 A
A
2. Cut your embroidery floss into 10″ lengths, 15 to 20 pieces per color. Lay your embroidery floss over one end of the hemp cord so that the midpoint of the floss is centered on the cord. As you position the embroidery floss, think about how you want the colors to show—the color you lay at the top will be the most prominent; the ones at the bottom will peek out more from underneath your tassel. Double-knot the hemp cords to hold the embroidery floss in place [B]. Trim excess hemp.
 B
B
3. Fold the embroidery floss down. Using a 9″ length of hemp cord, wrap around the floss at least five times, about 1″ from the fold, and double-knot it. Then wrap the ends of the hemp around again at least three times and double-knot the ends together. Trim any excess [C].
 C
C
4. Cover the hemp you just tied with the metallic embroidery thread, wrapping and knotting it around the embroidery floss the same way you did the hemp in step 3 [D]. If you’d prefer to leave the hemp cord visible, skip this step.
 D
D
5. Comb through the tassel in a downward motion, trim it to your desired length, and voilà! Your tassel keychain is complete.

Scrunchie Squad
We’re fully hair for this oversized scrunchie. All you need is elastic, cute fabric, and some simple sewing skills.
MATERIALS
- 21″ x 9″ piece of fabric (or 21″ x 4½” for a regular scrunchie)
- Iron
- Sewing machine (with thread and needle ready)
- Straight pins
- Fabric scissors
- 7″ length of ?”-wide elastic
- Safety pin
- Ruler
INSTRUCTIONS
1. Fold over the top ½” of one short side of your rectangular fabric so the wrong sides meet; iron flat [A]. Repeat on other short side. Fold fabric lengthwise, right sides facing, and pin [B]. Sew a ¼” hem along the length of the tube, leaving a 2″ gap in the center for turning the scrunchie right-side out later [C].
 A
A
 B
B
 C
C
2. Pull the fabric ends on one short side through the inside of the fabric tube until they meet the fabric ends on the other short side’s opening [D]. Pin the ends together on each side of the opening with the straight pins [E]. Then, sew around the opening, creating a cylinder, with a ¼” seam allowance. (Depending on the size of your sewing machine, it might be easier to hand-sew the openings together.)
 D
D  E
E
3. Find the 2″ gap that you left in the scrunchie during step 2. Pull the inside fabric through the gap so that the right side of the fabric is now on the outside.
4. Pin a safety pin to one end of the elastic. Pin the other end of the elastic to the 2″ fabric opening. Using the safety pin as a guide, thread the elastic through the fabric tube so that both ends are poking out of the gap. Overlap the ends, pin them, and then sew them together with your machine [F].
 F
F
5. Push the elastic inside the scrunchie and hand-sew the 2″ gap closed. Now, your oversized scrunchie is complete!

Cover Me In Daisy Chains
Spend some time stringing seed beads for a sweet chain
necklace or bracelet that’s fresh as a you-know-what.
MATERIALS
- 8/0 seed beads in at least three colors (one to separate the daisies, one for the daisies’ centers, and at least one for the petals)
- Silk thread with attached needle
- Jewelry clasps
- Scissors
INSTRUCTIONS
1. Measure and cut the silk thread to your desired length (note: the thread will shorten as you bead, so be generous). We cut 25″ for the necklace and 15″ for the bracelet. Triple-knot a jewelry clasp to one end to prevent the beads from falling off. Trim any excess thread near the clasp [A].
 A
A
2. Thread five seed beads in the color you’d like separating the daisies. Then, add four beads in the desired daisy petal color and one bead for the center of the daisy [B]. Using the needle end of your thread, pull the thread back through the first petal bead you strung in the opposite direction, toward the jewelry clasp. This will form the top half of the daisy [C]. Add three more petal-colored beads onto the thread. Then, pull the thread through the last petal-colored bead on the top of the daisy. This will form the bottom half of the daisy [D].
 B
B
 C
C
 D
D
3. Adjust the beads so they’re in the right spots and repeat step 2, switching out the petal beads if you’d like the daisy colors to alternate [E]. Continue this pattern until you’ve reached your desired bracelet or necklace length. Attach the other side of your jewelry clasp to the end and trim off any excess thread [F].
 E
E
 F
F
4. Tuck the finished piece in a small box or pouch for gifting.
By Anna Gragert
Photographed by Kat Borchart
This article originally appeared in the Winter 2021 print edition of BUST Magazine. Subscribe today!
More from BUST
6 Thoughtful & Clever DIY Feminist Gifts You Can Finish In Time For The Holidays
Dazzle-Up Your Photos With This DIY Stitchcraft Activity


