Set a colorful table with this simple napkin DIY
Whether you have a full set of matching place settings or a hodgepodge of thrift store dishware, reusable napkins are an easy way to tie your table together and give your dinner party all kinds of personality. (Plus, they spare the planet a bunch of paper waste.) This basic DIY bucks the season’s expected hues with bright colors and bold patterns using little more than some fabric paint. So jazz up your next brunch, or make a solo meal special (and highly ’grammable) with this deliciously simple project.
Materials
4 white cotton napkins (we hemmed our own napkins with LENDA fabric from IKEA)
Fabric/acrylic paints in black and the colors of your choice (we used white, violet, crimson, yellow, and orange)
Ruler
Masking tape
Foam brush
Small paintbrush
Iron
Instructions
1. Mix your paint colors using a paint palette or small containers. We mixed 1 part white with 1 part color to create these vibrant pastels.
2. Open your napkins so the right sides face up, landscape style, on a drop cloth or large piece of cardboard (something you won’t mind getting paint on). Use a ruler to determine the midpoint of the top and bottom of each napkin. Carefully apply a strip of masking tape, so that the left side of the strip goes right down the napkin’s middle, lining up at the top and bottom edges.

3. Use a foam brush to paint the left side of each napkin with a different color, being careful not to get paint on the right side of the masking tape. Let the first coat of color dry then apply a second coat, making sure the color is even.
4. After the second coat has dried, remove the masking tape. Use the paintbrush and the black paint to freehand different patterns on the right side of each napkin. We painted circles, stripes, half moons, and splatters (if you’re going to splatter paint, make sure to cover the left side of the napkin so you don’t smudge the color with black paint).

5. Let the napkins dry for 24 hours, then heat set your designs with an iron. Flip each napkin over and iron on the wrong side, being sure to turn off your iron’s steam setting. (Do not set your iron directly on the painted surface!) Wait for three days after heat setting before you wash your napkins, or follow the instructions for heat setting and care on your paint packaging.

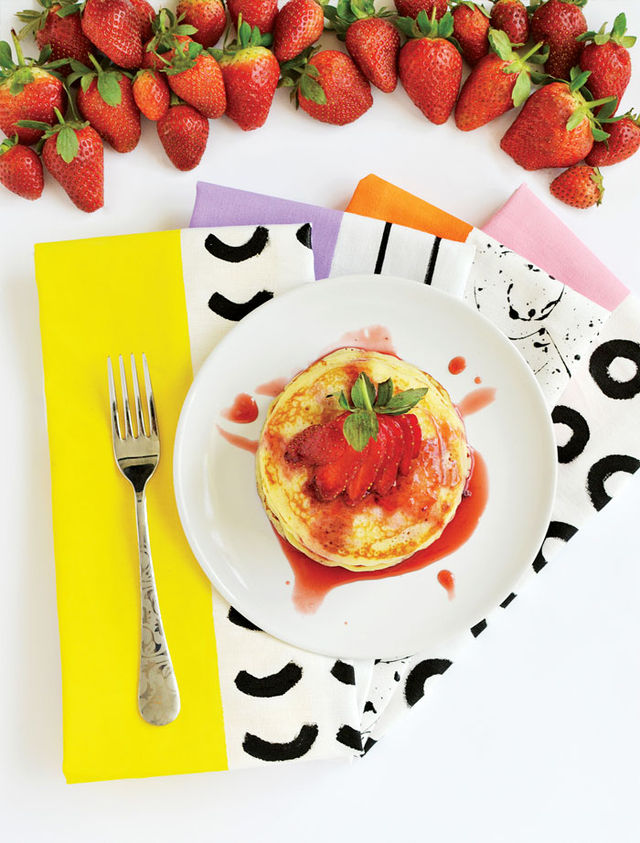
The finished result:

By Marwa Hayat, enthrallinggumption.com. Photos courtesy of Marwa Hayat.
This article originally appeared in the October/November 2017 print edition of BUST Magazine. Subscribe today!
More from BUST
Make Your Own Pom Pom Shoes With This DIY
Make Your Own “The Future Is Female” Papercut
Make This Witchy Moon Hanging In Just 6 Steps

