A Japanese Tinting Technique That’ll Perk Up Your Linens
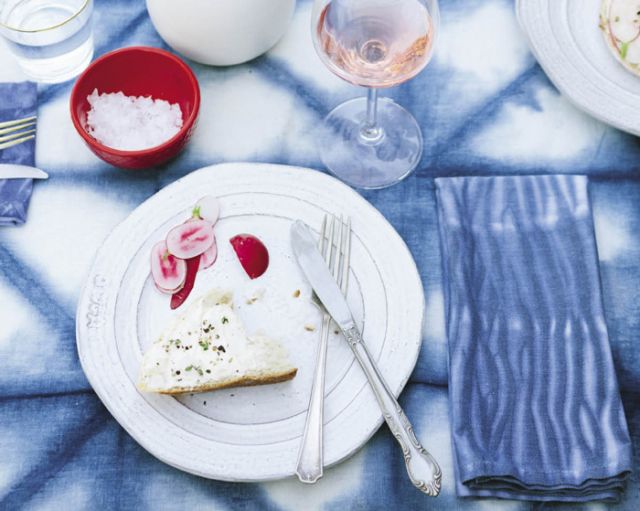
The fabric-dye trend is everywhere right now; people are going crazy for tie-dyeing, immersion dyeing, natural dyeing, and of course, shibori. The last one is often mistaken as tie-dye, but it’s actually in a category of its own. Shibori is a Japanese method in which fabric is made into a three-dimensional form via binding, folding, twisting, stitching, plucking, and plaiting; then it’s dipped into indigo dye. You can use any piece of fabric with this technique, but we’ll show you how to create your own shibori table runner and napkins.
Supplies
- Indigo dye (buy a kit at fabric/art stores, or dharmatrading.com)
- Material for dyeing, made of natural fiber like linen, hemp, cotton, or silk (We used dinner napkins and a 36 ” x 52 ” linen table runner.)
- Two five-gallon buckets
- Cardboard squares or triangles
- Rubber bands
- A large, smooth cylinder, like PVC pipe
- Clamps or rubber bands
- Rubber gloves
- Dropcloth
- Scissors
- Masking tape

Prepping your materials:
For itajime shibori, fold clean fabric vertically into uniform accordion folds: make your first fold, then fold again in the other direction, repeating until you have one long strip. Then fold it into smaller triangles or squares, using the same accordion-style fold. (See photo A.) Once it’s fully folded, place a corresponding-shaped piece of cardboard on both sides—this area will remain un-dyed—and use clamps or rubber bands to attach the cardboard to the fabric. (See photo B.)
A
B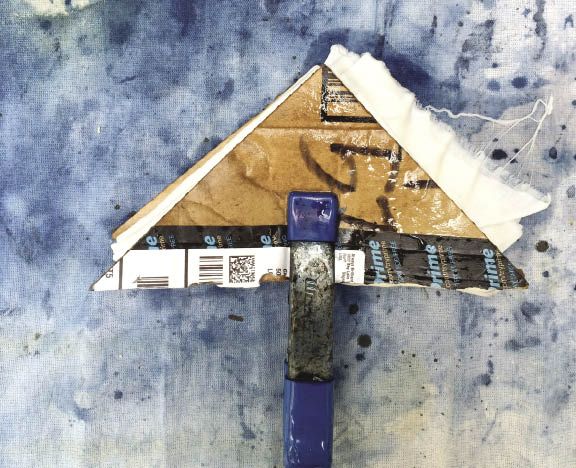
Arashi is a method in which you wrap fabric around a pole; use PVC pipe wide enough that your cloth can be wrapped around it vertically without overlapping. Note that using a large piece of fabric means you may need a really wide pole. (I used a 5 1/2 ” diameter pole for a 17 1/2 ” square napkin—to dye a 60 ” wide piece of fabric, you’d need a 19 ” diameter pole.) Tape the selvedge edge of the cloth to the pipe, and start wrapping the fabric flush with the top of the pipe. Take a piece of twine and tie it around the top of the cloth-covered pipe, then double-knot it. Begin wrapping the twine (firmly but not too tightly) around the pole, wrapping each loop at least 1/4 ” below the last one. Remove the tape and scrunch the cloth to the top of the pole (see photo C.); twist as you scrunch for diamond shapes, or scrunch straight up and down for stripes.
C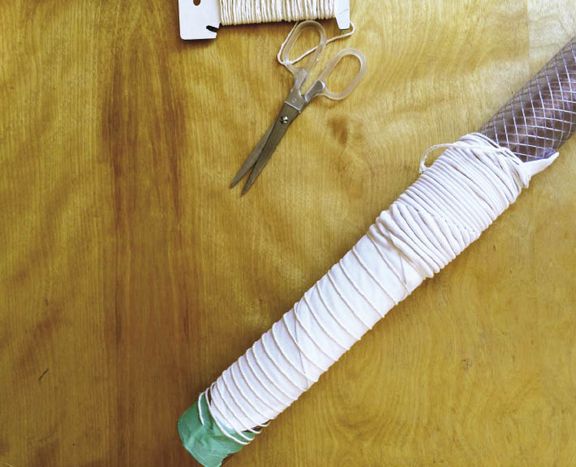
Dyeing:
Lay out your dropcloth, and mix dye according to package instructions. Wearing rubber gloves, submerge your prepared cloth into a bucket of water, and squeeze out the excess. Then place it into your bucket of dye and submerge completely (or dip parts for a varied look). Soak for at least 5–10 minutes, stirring occasionally with a wooden stick. Remove the dyed material. The fabric will be yellow-green when it comes out; let it sit for 10–20 minutes so it can oxidize and turn blue. If you want a darker indigo hue, repeat the dipping after oxidation; it may take several dips to get a deep, dark blue. Once you’re satisfied, remove the bindings or clamps and rinse under hot water, until the water runs clear. Hang to dry.
Written by: Caroline Hwang
Photographed by: Kate Miss
This story originally appeared in BUST Magazine. Subscribe today!

