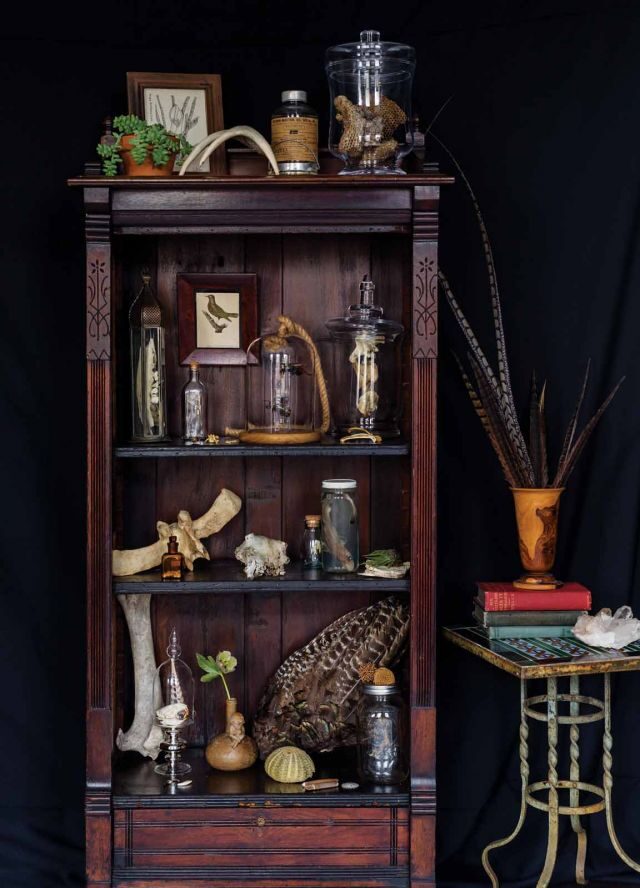
Curiosity cabinets gained popularity during the Renaissance, and are considered the precursor to museums. Originally, a “cabinet of curiosity” referred to an entire room filled with extraordinary items. Eventually, though, the term came to mean a single “curio” cabinet used to display a personal collection of objects—including (but certainly not limited to) preserved animals and bugs, bones, teeth, claws, feathers, horns, coral, stones, shells, plants, medical objects, drawings, paintings, interesting relics, and creepy doll heads.
To create your own curiosity cabinet at home, all you need to start is a cabinet or shelf to display your collection. You may want to get a cabinet with glass doors to keep dust and pets at bay. Then read on for some ideas about how to present all your weird wonders.
Start Collecting
Oddities can be found anywhere, so always keep an eye out. Junk shops, antique stores, and yard sales can all yield bizarro scores, and of course, mother nature always delivers, especially when the seasons change. Right after snow melts, look for bones and abandoned nests. Spring brings seedpods, abandoned eggs, cicada shells, and plants of all kinds, but curiosities abound year-round. Walk along the edge of waterways at low tide, and dig deep under leaf piles, abandoned houses, and buildings. The rhinoceros beetles in my cabinet came from my parents’ yard in Virginia—a dead tree was infested with beetles, and when fighting for the love of a lady beetle, the males of the species often get their horns entwined and fall to their deaths. Be careful not to disturb any living critters, nests, or hives while collecting.

Left to right: Deer jaw, antique bird painting, gopher paw, rhinoceros beetles, and cow vertebrae
Prep Your Findings
You can clean antiques, rocks, glass, and metal objects, but never try to wash delicate things like bug wings and seedpods. When working with bones, you may want to boil them to remove any remaining meat, marrow, and dirt. (It’s OK to skip this for a more natural look, but only if there is no flesh left on the bone.) To dehydrate items like chicken’s feet, crawfish, and bugs, place them in a safe, dry spot where scavengers won’t get to them. To avoid stinking up your space, you may want to place the item in a box covered with a screen and leave it outside in the sun, or near an open window in a well-ventilated area. Depending on the size and freshness of the item, drying can take one night or a couple of days. If you want to dry an insect in a certain position, see the instructions below, which I used for the beetles in my cabinet.
 Left to right: Cow femur and muskrat skull, Antique syringe and wasp’s nest
To Prepare an Insect:
If the bug is not a fresh death, you will need to “relax” it by steaming it, so you can manipulate its body without causing damage. Don’t put the bug directly in water—just expose it to steam. I raised a drying rack over my teapot, but you can also fill a container with boiling water, stuff it with several layers of paper towels, and rest the bug on the top (be sure that the water does not absorb up to the insect). After 20 minutes, gently move the bug’s legs to check the flexibility. The insect is ready when the legs can be easily moved and the body does not feel brittle. Now you can carefully move the legs and antennae into the desired positions. If you do break a limb off, use clear glue to reattach it.

Beetles being prepped to mount
To Spread the Wings:
Hold the insect with two fingers on one side of its body, and lift the opposite wing up from the back. You will hear a snap when the joint gives, but don’t freak out; now you can lift the wing up and out, very carefully. Repeat on the other side.

Cow vertebrae and a Chicken foot in jars
To Pin:
While the bug is still steamed open, put it on a piece of cardboard and place straight pins around the body as close as you can get without going through it. Cross two pins over each other to hold limbs in place. If you spread the wings, place a strip of paper over each wing before you pin it—this keeps the wings from curling. Let dry completely before removing the pins (the wings will take longer to dry than the body). Try to touch the insect as little as possible, so you don’t rub off any little hairs.
 Mounted rhinoceros beetles
To Mount:
Measure the height at which you want the bug to sit, and use wire snips to cut 1.4 mm-wide music wire or a metal dowel to the desired length. Lay the bug on its back and add a drop of hot glue to one end of the wire, then center the wire in the dip where the head meets the thorax. Let dry, then add a drop of hot glue to the other end of the wire and secure it to a base.
Show It Off
How you display your findings is completely up to you. I strung three cow vertebrae together with invisible thread, weaving through the natural holes in each one, and made a loop at the top. On the inside of the lid of an apothecary jar, I hot glued a clear hook to the center and, once dry, slipped the loop over so the bones dangled in the jar. I also hung a moose tooth, chicken’s foot, and gopher paw in the same fashion. For corked or mason jars, you can just tie the specimen to the center of the invisible thread and place each end of the thread over opposites sides of the jar lip, and then put the cork or lid on to secure the thread. Once your shelves are stocked, invite friends over to ooh and ahh at your collection. No matter what’s in it, your curiosity cabinet is sure to be a cool conversation piece.
-Callie Watts
PHOTOGRAPHED BY BURCU AVSAR

This article originally appeared in the print version of our June/July 2015 issue. Subscribe here.

