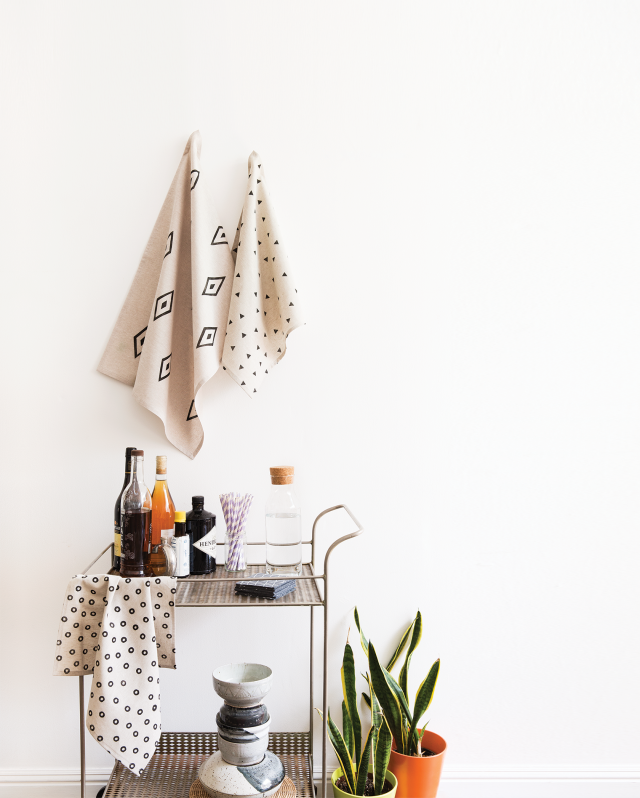
Photographed By Julia Stotz; Ceramic Vessel: Toools.co
Pattern Recognition
CUTE UP YOUR KITCHEN WITH A BLOCK-PRINTED TEA TOWEL
Tea towels don’t have to be basic. With this easy, custom block printing technique, you can give your kitchen any look you want. Plus, creating your very own pattern is a super satisfying endeavor (I do it on the regs as the textile designer behind Cotton + Flax, my modern handmade home décor line). Bringing it to life is just icing on the tea cake.
What You’ll Need
-
Pre-sewn blank tea towel (choose a natural fabric like linen or cotton, and look for a smooth, tight weave)*
-
1 soft linoleum E-Z-Cut printing block*
-
Pencil and paper for sketching your design ideas
-
Cutting mat or newspaper
-
Carving tools: Speedball makes an inexpensive set of linoleum carving tools* or use an X-Acto knife for basic shapes
-
Water-based block printing ink suitable for fabric in your desired color(s)*
-
Soft rubber brayer*
-
A piece of flat glass, plexi glass (available at Home Depot), or plastic surface to roll out ink
*Available at dickblick.com. For a block printing kit or blank tea towels, try dharmatrading.com.
Instructions

-
Choose a flat, clean surface to work on. Use a cutting mat or newspapers to protect it while you carve the linoleum. Sketch your design ideas or shapes on a piece of scratch paper. The areas you carve away from the block will not print; they become negative space, so it can be helpful to think in reverse. The imagery will consist of whatever flat surface you leave behind—this is called relief printing. Aim for designs with lots of bold flat color, and not too much fine detail. Consider the scale of the tea towel, and how many times you’d like your design to repeat. You can carve one design to repeat in a simple brick layout, or multiple designs to alternate, or create a random, tossed pattern.

-
Once you’ve decided on a design, place your pencil sketch face down on the linoleum block, and rub the back of the drawing with the back of your fingernail to transfer the graphite image onto the block. Keep in mind that the image will reverse when printed, so don’t worry if it doesn’t look quite right at first.

-
Carve the outline of your shape with an X-Acto knife, holding the knife at a 90-degree angle to the table surface. Carve the details by pushing your linoleum carving tools along the surface of the block away from your body, using light, even pressure. The linoleum is soft, and will easily give way. Be careful not to keep your fingers in front of the blade! Experiment by carving larger or smaller shapes to see the variety of textures you can create.

-
Lay your tea towel face up on your work surface. Draw a spoonful of ink across your glass or plastic inking plate and roll the rubber brayer back and forth over it to create a thin, even layer of ink with roughly the texture of an orange peel. Ink up your stamp by rolling the inky brayer over the surface of the block, until the design is evenly covered. Firmly press the stamp onto the towel with your fingers or the heel of your palm.

-
Continue to print your design in whatever arrangement you prefer, adding ink to your block with the rubber brayer each time. I like a simple repeat pattern, but random arrangements are fun, too. Try using a couple different colors of ink, or mix two or three stamps into one design! When you finish printing, rinse your linoleum block(s) with cool water, gently dry, and save it to print another day.

-
Once the ink has dried on your tea towel, follow your ink’s instructions for heat setting your design so that it can be laundered normally. (This typically calls for ironing your design for 3 to 5 minutes.) Voila! Your tea towel is ready to beautify your kitchen, or, if you’re feeling generous, be gifted to a friend.
—
By Erin Dollar, cottonandflax.com
This article originally appeared in the August/September 2016 print edition of BUST Magazine. Subscribe today!
More from BUST
How To Have A Feminist Wedding: The Complete Guide
This DIY Book Purse Is Perfect For A Literary Lady


