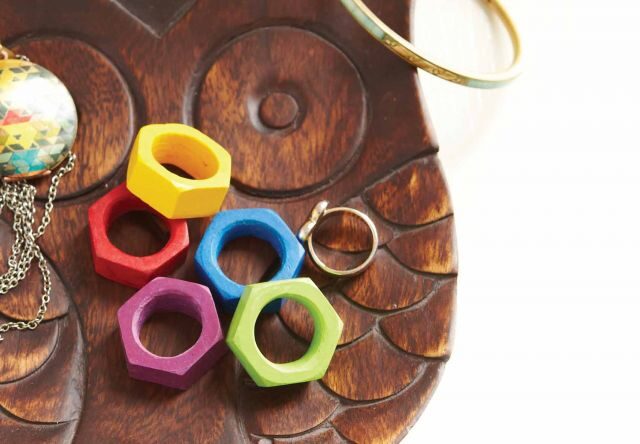
To add a little multipurpose bling to your outfit, skip the candy necklace and go slip on some crayon rings. These chunky bands provide artsy oomph, and as a bonus, they’re super easy and inexpensive to make. So grab that box of crayons you’ve had rattling around since the third grade, dust off your old coloring books, and read on!
Materials
Newspaper
Modeling clay
Paper or plastic cup, at least 2″ in diameter
Popsicle sticks or plastic spoons, for mixing
Petroleum jelly
Silicone rubber or putty—or use a mold-making kit such as EasyMold (look for it in the sculpture section of most arts-and-crafts stores)
A hardware nut large enough to fit your finger (we used one with a ¾” opening)
Crayons. Brand name is better, since cheaper crayons have more plastic, and are tougher to melt. You’ll need about three crayons to make one ring.
X-Acto knife
Clean tin cans or soda cans with the tops cut off
Cookie sheet
Oven mitt
Pliers
Fine grit sandpaper
To make the ring mold
1. Cover your work area with a few layers of newspaper, in case things get messy.
2. Line the bottom of your cup with a ½” layer of clay.
3. Coat your nut in a thin layer of petroleum jelly and center it in your cup. Lightly press the nut into the clay, just enough to keep the nut from moving around. Make sure there’s at least ½” of space around it.
4. Prepare the silicone rubber according to the instructions on the package. You don’t need to mix up much—somewhere between ¼ cup and ½ cup should do.
5. Pour the silicone into the cup with the nut and clay, making sure to completely cover the nut. Let the silicone rubber set—depending on your mix, this can take anywhere from a few minutes to a couple of hours.
6. Once the silicone rubber sets, use your X-Acto knife to cut away the cup. Peel off the clay, bend the mold a bit to remove the nut, and you’ve got a ring mold.
To make the rings
1. Use the X-acto knife to cut the paper wrappers off the crayons. Break each crayon into 4 or 5 pieces and place the pieces into the tin can or soda can, grouping like colors.
2. Place the crayon-filled can onto the cookie sheet, and slide it into a 325-degree oven.
3. Once the crayons melt (which should take about 3 to 5 minutes), take the cookie tray out of the oven with your oven mitt. Use your popsicle stick or plastic spoon to quickly stir the melted crayons together to make a solid color (or you can leave them unmixed for a subtle marbled effect).
4. Pick up the can with pliers and carefully pour the melted crayons into your mold (remember to do this over newspaper), filling it just to the top. Wait about 15 minutes for the melted crayons to cool and solidify, then bend your mold a bit and pop out the ring.
5. Use the sandpaper to smooth out any rough spots. Then color away with your fancy new finger jewelry!
By Francesca Franco
Photographed by Linda Pugliese
 This article originally appeared in the print version of our February/March 2012 issue. Subscribe here.

