Case In Point
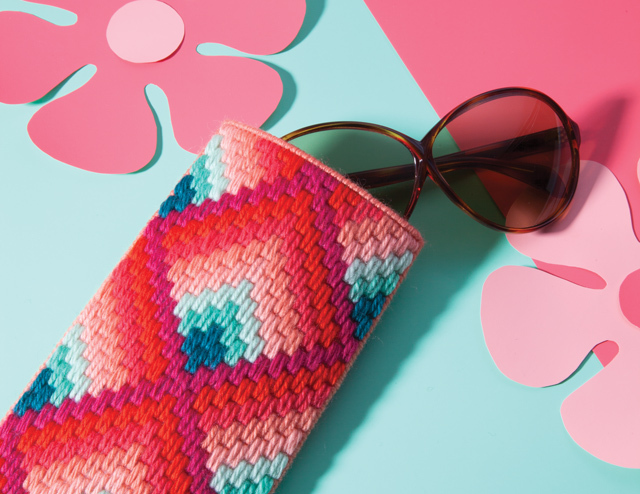
Keep your sunglasses safe from scratches with a DIY case loaded with throwback flair. Stitched in bargello, a style of needlepoint popularized in the ’70s, this method is super easy to learn, fast to do, and it looks aah-mazing. This trippy technique might just be your new crafting obsession, so grab a needle and let’s bargello!
MATERIALS
-DMC Tapestry Wool, 1 skein each in the following colors: 7600, 7606, 7106, 7851, 7852, 7604, 7912, 7596*
-1 sheet 10-count plastic canvas*
-Size 18 tapestry needles*
-Scissors
*Available at hellobargello.com
INSTRUCTIONS


 a1. Cut two pieces of plastic canvas measuring 38 squares wide by 77 squares long. Thread your tapestry needle with a 24″ length of tapestry wool in color A (see color key in chart). We’ll begin by stitching the color A stitches at the center top of the chart; locate the corresponding center top squares of one piece of canvas to start.
 b
b
2. Each bargello stitch is a simple vertical line: pull the needle up from the back of the canvas until there’s a 2″ yarn tail on the back, and insert the needle again from the front, 4 squares down, staying in the same column of the canvas. All stitches are 5 squares tall, with 3 empty squares between where the needle comes up, and then goes back down. (a) (The exception is along the top and bottom edges, where some stitches are only three squares, as shown on the chart.)
 c
c
3. Follow the chart to work all the color A stitches (stitching over the 2″ yarn tail until it’s covered to secure it) in any sequence you like, such as working down the right side of the design and back up the left side (b).
 d
d
4. When you start to run out of yarn, fasten off by drawing the needle under your previously worked stitches for about 2″ on the wrong side of the canvas (c), then trim the excess yarn. Thread the needle with a new piece of yarn, and begin working again by drawing the needle under your previously worked stitches for about 2″, emerging where you want to begin stitching. Expect to use about 5–6 24″ lengths of yarn to complete the color A stitches, which act as the framework of the design; all the remaining colors will be oriented around this outline (d).
 e
e
5. Next, thread the needle with color B. For each color B section, stitch from left to right (e), working the color B sections in any order until you’ve finished all the color B stitches, beginning a new strand of yarn when necessary.
 f
f
6. As you add this and all subsequent colors, note that newly worked stitches will always share a square with their neighbors above and below (f). (In other words, two stitches will be worked into the same square when they meet vertically.)
 g
g
7. Continue following the chart to fill in all the squares of your plastic canvas panel. Repeat with the second plastic canvas rectangle to make two panels for the front and back of the sunglasses case.
 h
h
8. To finish, use color D to whipstitch along the top edge of each panel (g), placing one stitch in each square and stitching over the edge of the plastic canvas (this will be the opening of your case). Next, place the panels together, back sides facing, and sew them to each other along the sides and bottom edges, working a whipstitch through both layers of plastic canvas (h). Make 3 stitches in each corner square to fully fill out the corners and prevent the plastic canvas from showing through.
For more in-depth bargello instructions, videos, and kits, visit hellobargello.com.
By Brett Bara, hellobargello.com
Photographed by Amy Elizabeth
This article originally appeared in the May/June 2019 print edition of BUST Magazine. Subscribe today!
More from BUST
A Beginner’s Guide To Punch Needling
Go Green With These DIY Living Air Plant Accessories
DIY This Minimalist Wreath In 4 Steps


