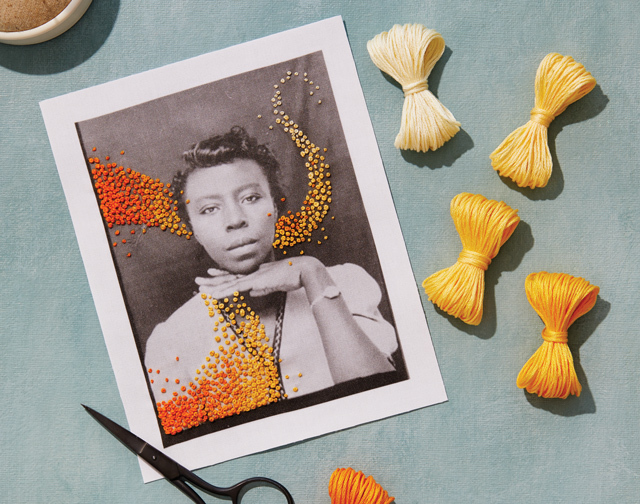
Add some magic to your favorite photos by getting a little knotty.
The often feared but oh-so-fabulous French knot is easier to ace than you might imagine. It’s also the perfect embroidery stitch to transform your fabric-printed photos into wall-ready works of art. Have a yearbook photo that needs a makeover? A group portrait you want to add some extra joy to? Thoughtful placement of a few French knots can highlight trim on an outfit, punctuate the center of a flower, or fill the air with confetti. En masse, they can create new hairdos, fill borders and backgrounds, or even reimagine the family photo album with a little magical realism.
Materials
Photo image on fabric
Embroidery hoop
6-strand embroidery floss in your chosen colors
Embroidery needle
Scissors
Instructions
1. Select a favorite personal photograph or public domain image that can be used without permissions or restrictions, like from The New York Public Library (digitalcollections.nypl.org, check the “public domain materials” box) or the British Library (flickr.com/photos/britishlibrary). Crisp, clear, black-and-white photographs work best, and will provide an eye-popping contrast with colorful embroidery floss.
2. There are two ways to transfer an image to fabric. Using an inkjet printer, you can print your image yourself onto paper-backed cotton fabric sheets (Jacquard Cotton Inkjet Fabric Sheets, $18.99 for a pack of 10, joann.com)

For a higher-quality result, upload your image to a fabric print-on-demand service, like spoonflower.com (I recommend choosing “linen cotton canvas”), and wait for your fabric-printed photo to arrive. It’s best to scale your imagery to no smaller than 4″ x 6″.
3. Before you begin, consider your overall composition by printing a practice photo on paper and sketching the general placement of your stitches.

If you’re concerned about “ruining” your image, know this: you can practice on scrap fabric until you feel more confident and any rogue knots can be pulled out, allowing you to start again!
4. Load your fabric into your embroidery hoop so the surface is smooth and taut. Cut a 12″ to 16″ length of embroidery floss, and split off three strands. Knot one end and thread the other through your embroidery needle leaving a 2″ tail. Determine the location of your first French knot and push your threaded needle through the fabric, entering from the underside and pulling the floss through until the knot catches on the back.

5. Set your hooped fabric down on your work surface. Hold your needle in your dominant hand and then take the 2″ to 3″ of the floss closest to your knot, hold it taut with your non-dominant hand, and don’t let go. There’s no need to pull hard, you just want to create a straight line of the floss with gentle tension.

6. Bring the needle towards your body and hold it parallel to the fabric; wrap the taut part of the floss around the needle three times.

Position the tip of the needle right next to where the floss initially came up through the surface and then pierce the fabric again—but don’t push the needle all of the way through.

Now gently pull the floss with your non-dominant hand and watch the wrapped knot slide down the needle to the surface of the fabric.
7. Next, slowly push the needle through the fabric, releasing the floss and lifting the hoop up off your work surface, allowing you to pull the floss all the way through.

The end result is a neat, three-dimensional knot that sits on the surface of your fabric.

8. Create as many French knots as you’d like with your length of floss, but leave yourself at least 3″ at the end. After completing your final French knot, separate the strands on the underside of the fabric, knot together, and trim.

By Robert Mahar
Visit robert-mahar.com for more embroidery and diy tutorials.
Top photo by Kat Borchart
Crafting photos by Robert Mahar
This article originally appeared in the Fall 2020 print edition of BUST Magazine. Subscribe today!
More from BUST
How To Make Your Own Hand Sanitizer
How To Build A Sustainable Closet
Embrace The Fringe With This Shady DIY Lamp Décor


